
Quilted potholders are a super simple project, but for some reason I've just never made my own! I had a bunch of scrappy pieces lying around from various projects and I wanted to make something other than a pillow, so I decided that now was the time to make some potholders happen!
I love blues and greens as you can tell, so I whipped up a few of these adorable 9 patch scrappy potholders to go in the kitchen of our new RV.

And I randomly sewed the colored squares together so every potholder looks a bit different!
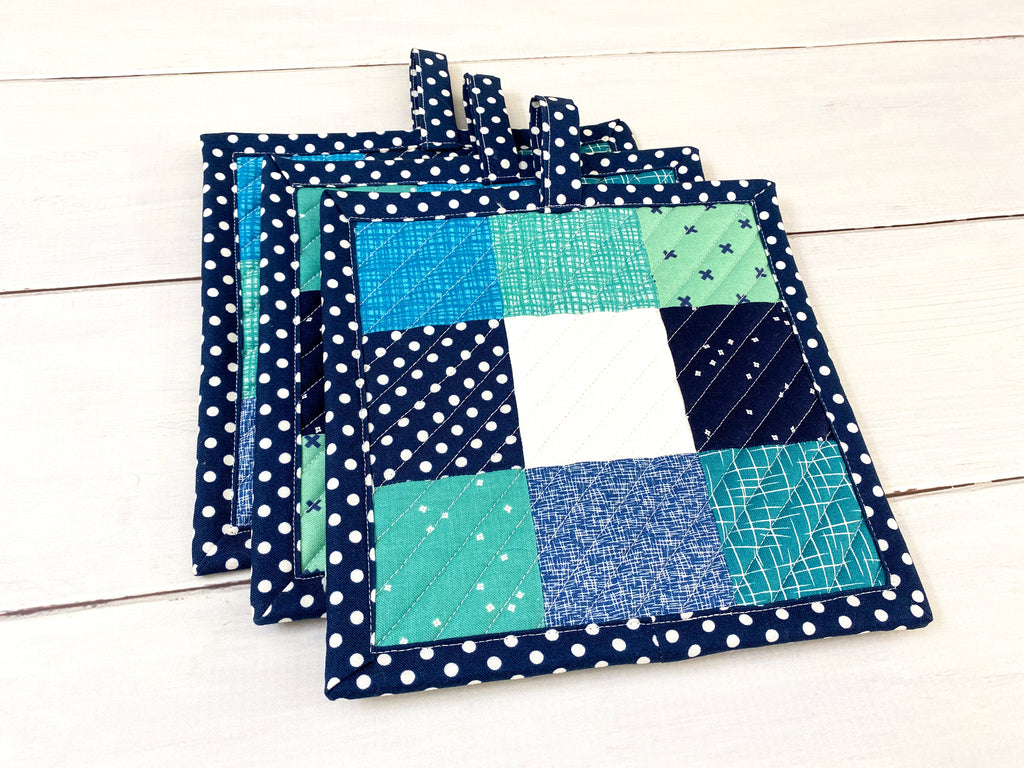
For this set of potholders, I used various basics from Riley Blake Designs. The prints I went with were:
- Blossom in Rainforest and Navy
- Texture in Caribbean and Rainforest
- Mini Hashtag in Navy
- Large Hashtag in Teal
- Bee Basics X in Teal
- Small Dot in Navy
- Confetti Cotttons in White

I like a nice simple design, so I opted for a 9 patch block, but the white center gives it a bit of a modern look.


I wrote up a little tutorial on how to make your own!
Tutorial - Scrappy 9 Patch Potholders
Supplies needed:
- (9) 3" squares of cotton fabric for the top piece
- (1) 8½" square of cotton fabric for the bottom piece
- (2) 8½" squares of cotton batting (with or without scrim is fine since this is NOT going in the microwave)
- (1) 8½" square of insulated batting (it's a silver color and usually called Insul-bright or Insul Fleece)
- (1) 2½ × 42" strip of fabric for binding
Finished side: 7"

DIRECTIONS
1. Lay out the (9) 3" squares in a 3 x 3 grid pattern. I chose a white center here because I think it gives it a more modern look.

2. Sew the (3) squares in each row together.

3. Sew the (3) rows together.

4. Layer pieces in this order - 9 patch top (right side up), cotton batting, insulated batting, cotton batting, and solid fabric bottom (right side down). Baste layers together either with spray basting (what I used) or pins.
💡 TIP - When using basting spray, I like to iron each time I add a new layer to help the heat set the adhesive. When attaching a fabric piece to batting, I prefer to spray the batting because sometimes the spray leave stains on the fabric if you spray it directly.

5. Quilt as desired and trim to 7½" square. I used diagonal lines 1/4" apart on mine.

6. Prepare the small loop piece by cutting off a 6" length of the binding strip. Fold it in half (wrong sides together) and then fold each half in half again, toward the center. Stitch a seam along the long edge.

7. Prepare the remainder of the binding strip by folding and ironing it in half (wrong sides together).

8. You are going to bind it in a similar method as a quilt. If you are already a pro at this, skip down to STEP 13. On small projects like this, I like to sew my binding to the back first and then do my final stitch on the front.
Flip the potholder over and pin one of the narrow unfinished ends of the small loop piece to the edge that you want to be the top of the potholder (as shown below).
On the bottom of the potholder, align the unfinished side of the binding parallel with the bottom edge of the potholder (as shown below). Note that you aren't starting at the right bottom corner. You want to leave an inch or two of the edge open. Pin to hold it in place.

9. Using a 1/4" seam allowance, start sewing the binding down near the other corner. Note - you want to leave a few inches unsewn at the end so you can join the pieces together. When stitching the binding down, I like to use a small 1.8mm stitch length.
VERY IMPORTANT - When you get about 1/4" from the edge, turn the potholder so you sew a diagonal line off the corner. This is what will allow you to create a mitered corner.

10. First, flip the binding strip straight up (first picture), then flip it back down so you have a folded edge at the corner (second picture).


11. Flatten the new folded edge of the binding. Starting at the top right corner, sew down the edge using the same 1/4" seam allowance.

This is what the first corner should look like.

12. As you sew the binding to each edge, you will repeat steps 9-11 so that all (4) corners are finished and you end up with the two unattached binding pieces on one side like this.

13. Because this potholder is small, the usual way of joining the binding pieces using a diagonal seam is kind of difficult. Again, if you are a pro at this, feel free to do it this way. To make it easier, I sewed a straight seam that worked just as well.
The easiest way to do join the binding is to fold the edges together until they meet. You will want to trim off most the excess fabric strip so you only have about an inch or two left inside the fold. Iron press the fold so you get a nice crease.

14. Now unfold each side and pin the pieces together RST so the creases meet. Sew together on the creases. It's better for the binding to be slightly tight than slightly loose. So if you need to sew a second seam to make it a bit tighter, you can.

15. Iron the newly joined binding edges down flat and then stitch 1/4" along the edge of the newly joined section. The binding should now be completely secured to the potholder.

16. To make the binding easier to fold over, iron the fabric flat along the seam all the way around the potholder.

17. Flip the potholder over and tuck the loose edge of the loop under the binding.

18. With unfinished edge of the loop tucked under the binding, fold the binding down and pin on either side of the loop. Then press the loop down and pin. You will stitch over the loop piece here. This will help the loop lay down flatter. You can use pins here if you prefer.

19. Finish clipping the binding all the way around the potholder. It makes it easier to keep it in place while you sew. At the corners, fold the pieces so you get a nice miter edge (the diagonal fold). Pin the fold down.

This is what is should look like when pinned. Now sew a seam all the way around to secure your binding. Before sewing, you will probably want to increase your stitch length to 2.5-3mm if you have it smaller so your stitches look neat.

And it's done! Look how cute these are!

Along with the pillows I've been making, I think these would also make adorable (and quick) gifts for the holidays!

What's your favorite quick gift to sew up? Really it's never too early to start planning for holiday sewing! LOL
Until later, happy sewing!
Jamie
3 comments
This looks very helpful for a beginning quilter like me!
This is a very good tutorial, I plan to make some of these for Christmas. Thank you
Really very helpful. Thank you very much